|
Installation Instructions - Qualified Electrician
General information
Model: SOLAR SWITCH BOX E8 -4/A4/G2
What is the SSB and
what does it do ?
The solar switch box (SSB) connects the 8 SRT strings (12 SRT = 1 string) At this
stage the string voltage is under a harmless 75 V DC.
SSB Construction:
CE, safety class system II, system voltage 300 V DC suitable for indoor humid conditions,
flame retardent 180x130x35 mm housings with transparent cover,
SSB for 96 SRT (1kWp)
The Electrician
The electrical installation may be only carried out
by a licensed electrician.
The electrician is responsible for the installation from the solar switch box to the grid.
He must know all the regulations, stipulated by the power company, in regard
to grid
connected pv installations.
The Electrical Check
The electrician is required
to make an electrical check before the installation starts.
He will..
1. Specify the ideal DC
connection between the solar switch box and inverter (check your inverter manual from the manufacturer).
Note: The inverter must be installed as close as possible to the solar switch box and should be
located in a well ventilated place,
protected from light and humidity.
2. Determine the best AC connection between the inverter and the power grid, and also know all the necessary equipment
recommended by the regional power company, like electric meter, safety fuses, ENS de-energizing devices etc.
3. Inform your power company about the pv installation.
4. Submit an application
for any subsidies offered by your power company or regional authorities.
Solar Switch Box Installation
The SSB is already mounted under the roof by the roofer near the cable inlet. This must be a dry, accessible place without direct exposure to the sunlight.
The SSB is not allowed to be
opened by anyone other than a qualified electrician.
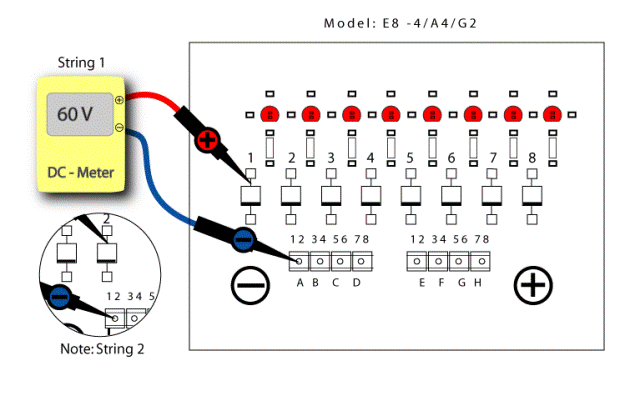
If a string (12 SRT) is correctly assembled and connected, the appropriate red indication lamp will light up inside the SSB (only during daylight
hours). All 8 lamps should be lit up before continuing.
Electrical Assembly
First check
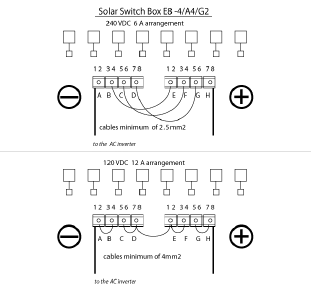
in the inverters manual what the input voltage level is:
120 Volt or 240 Volt. (open circuit voltage of the pv generator)
The cover of the SSB is opened. To measure the voltage of the strings follow
the diagram below.
|